How to Transfer a Domain from WordPress to Wix
If you’ve built your website on WordPress but decided to move to Wix, one of the first questions you’ll face is: “Can I transfer my domain, too?” The short answer is yes. You can move your domain from WordPress to Wix by unlocking it with your current registrar, obtaining an EPP (authorization) code, confirming the transfer request inside Wix and then waiting for DNS propagation to complete.
The process isn’t instant – it usually takes several days for the transfer to fully finalize – but with the right preparation, it’s smooth and safe. In this article, we’ll walk you through each step in detail, explain what happens behind the scenes and cover everything from costs and timeframes to SEO precautions and troubleshooting.
Whether you simply want to consolidate billing and DNS management in Wix or you’re planning a complete migration of your website, this guide provides all the answers you need.
By the way, if you’re still weighing platforms, here’s a full Wix vs WordPress comparison to help you decide which builder is right for your long-term goals.
What Does “Transferring a Domain” Mean?
When people talk about “transferring a domain,” they often confuse it with simply pointing the domain to a new host. These are two different approaches:
- A domain transfer means that the registration itself moves from one registrar (in this case, WordPress/Automattic or its partner) to another (Wix). After the transfer, Wix becomes your registrar of record, and you manage everything – renewals, DNS settings and ownership – directly from your Wix account.
- Domain pointing (connecting) keeps the registration where it is (WordPress or another provider) but changes the DNS records so your site loads from Wix. You’ll still pay renewal fees and manage DNS at your old registrar, but Wix will serve your website.
When to Transfer vs. When to Connect
The decision between transferring your domain to Wix or simply connecting it often depends on your priorities and the other services tied to your domain. Both options will let visitors reach your Wix website, but the management experience is very different. If you’re not sure whether moving to Wix is the right decision, it’s worth looking at platform reviews before committing. Here’s a full WordPress review that breaks down its strengths and weaknesses beyond just domain management.
When to Transfer
Transferring is the right choice if you prefer simplicity and want everything managed under one roof. Once the transfer is complete, Wix becomes your registrar. That means:
- You’ll handle renewals and billing directly in Wix.
- DNS records are controlled from the Wix dashboard, which is useful if you’re only running your main website and don’t need complex setups.
- Wix automatically provides and manages SSL certificates, saving you time.
- Support requests related to both your site and domain can be handled by the same provider.
For example, imagine you run a local bakery. You don’t have complex IT systems – you just need your domain, your Wix website and perhaps a simple email address. By transferring the domain, you’ll manage everything from one place, with fewer logins and less chance of forgetting where to update settings.
When to Connect
Connecting (pointing) the domain is the better option if your domain already has services tied to it outside of WordPress hosting. That might include:
- Professional email hosted through Google Workspace, Microsoft 365 or Zoho.
- Custom subdomains (e.g., shop.yourdomain.com for e-commerce or blog.yourdomain.com for a blog).
- Special DNS configurations for apps, APIs or company systems.
In these cases, a full transfer could disrupt services if the DNS setup isn’t perfectly replicated in Wix. Connecting avoids this problem, because your registrar remains unchanged – you only update the nameservers or A/CNAME records so your main site points to Wix.
For instance, if you’re a consulting firm that uses Google Workspace for email (name@yourdomain.com) and has a client portal running on a subdomain, it’s often safer to keep the domain with your current registrar. That way, you maintain tight control over advanced DNS records while still letting Wix handle your website.
Thus, transfer is best for simplicity, centralization and beginner-friendliness, while pointing is great for flexibility, advanced setups and avoiding disruption to existing services.
Restrictions You Should Know
Before starting the transfer process, it’s important to understand the limitations imposed by ICANN (the Internet Corporation for Assigned Names and Numbers) and by Wix itself.
- 60-Day Transfer Lock. Domains cannot be transferred within 60 days of their initial registration or within 60 days of a previous transfer. This lock is not unique to Wix or WordPress – it’s an ICANN requirement that places a 60-day lock after registration or transfer. The rule exists to prevent fraud and unauthorized moves.
- Eligible Extensions (TLDs). Not all domains are eligible for transfer. Wix accepts most mainstream domains like .com, .net, and .org. However, some niche TLDs aren’t supported. In such cases, you might consider alternatives – for instance, exploring the best WordPress alternatives to move your website can give you a wider perspective if Wix doesn’t support your extension.
Country-specific domains include .us, .ca, .de, .fr. However, some specialty or regional extensions are not eligible. For example: .io (popular among startups and tech companies), .co.uk (UK-specific domains often have unique rules), certain new gTLDs like .design, .app, or .xyz may also be unavailable. If your domain uses one of these unsupported extensions, you can’t transfer it to Wix, but you can still connect it by updating DNS settings at your current registrar.
By the way, you can use Wix’s domain transfer checker (inside the dashboard) to confirm whether your domain is supported. Just type in your domain name, and Wix will tell you if a transfer is possible or if you’ll need to use connection instead.
Preparing Your Domain for Transfer
Before you start the transfer, a little preparation is necessary. These steps ensure that your domain will move smoothly from WordPress to Wix without interruptions.
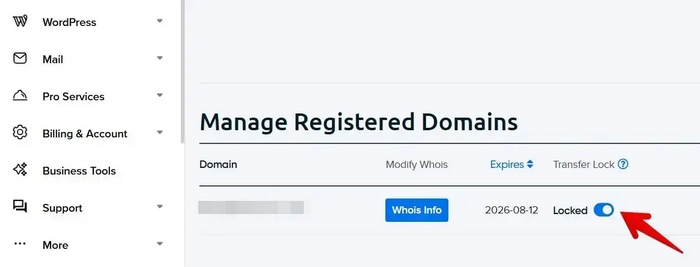
How to Unlock Your Domain in WordPress
Before you can transfer your domain to Wix, you need to unlock it with the registrar where it was originally purchased. If you registered your domain when setting up WordPress hosting, that registrar may be GoDaddy, Namecheap, Bluehost or another provider.
Here’s the general process (it looks almost the same at most registrars):
- Log into your domain registrar account (not the WordPress dashboard).
- Go to the Domain Management or My Domains section.
- Select the domain you want to transfer.
- Find the setting called Domain Lock, Registrar Lock, or Transfer Lock.
- Toggle the lock off to unlock the domain.
Note that the exact menu names may vary by registrar. Some may call it “Security Settings” or “Transfer Options”. If you can’t find it, search your registrar’s help docs for “unlock domain” instructions.
Once the domain is unlocked, you’re ready to request the EPP code, which is required to complete the transfer in Wix.
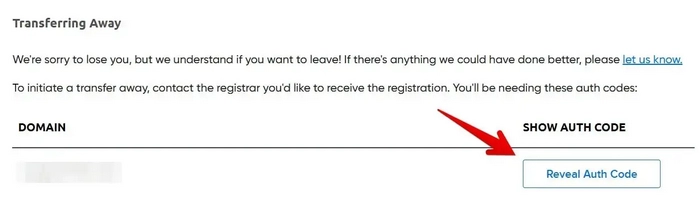
Where to Find the Authorization (EPP) Code
The EPP code (also called authorization code, Auth code, or transfer key) is a unique password used to confirm domain transfers.
- In most registrars, you can request it directly from your domain’s settings page under Transfer Domain or Get EPP Code.
- Some providers email the code to the administrative contact address listed in WHOIS.
- Copy the code and keep it secure – you’ll need it when starting the transfer inside Wix.
Checklist Before Starting Transfer
Before launching the transfer, double-check the following points:
By completing this checklist, you’ll avoid the most common problems like failed transfers, lost emails, or downtime during the move.
Step-by-Step Transfer Guide
Once your domain is unlocked and you have the authorization code, you’re ready to begin the actual transfer. Here’s how the process works from start to finish.
1. Unlock Your Domain
As explained earlier, domains are locked by default to prevent unauthorized moves. Log into your WordPress account (or your registrar’s panel if WordPress is only a reseller), find the domain lock setting and toggle it off. You’ll usually see a status message like “Domain Unlocked” when it’s ready.
2. Obtain the EPP Code
The EPP code is essential. Without it, Wix cannot request the transfer. Request the code from your registrar. Keep it safe – think of it as a transfer password.
3. Start the Transfer in Wix
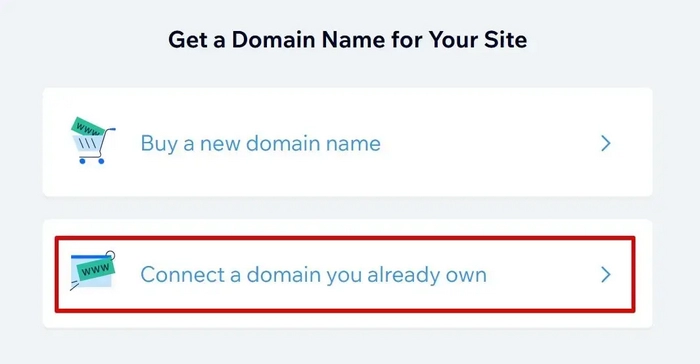
Now switch over to Wix:
- Go to your Wix Dashboard → Domains → Transfer a Domain You Already Own.
- Enter the domain name (e.g., mydomain.com).
- Paste the EPP code when prompted.
- Pay the transfer fee (which also renews your domain for one additional year).
Once payment is complete, Wix submits the transfer request to your current registrar.
4. Confirm by Email
Shortly after the transfer request is submitted, you’ll receive an approval email at the administrative contact address. This is a security measure to confirm that you – the domain owner – initiated the transfer.
- Open the email and click the confirmation link.
- If you don’t see the message, check your spam/junk folder or make sure the contact email in your domain’s WHOIS details is current.
5. Wait for DNS Propagation (24–48 Hours)
Once the old registrar releases the domain, Wix begins to configure your DNS records. This stage, called DNS propagation, can take between 24 and 48 hours. During this time:
- Some users may still see your old site, while others will see the new Wix site.
- This is normal – DNS changes roll out gradually across global servers.
6. Verify Functionality
When the propagation window ends, it’s time to check that everything works:
- Visit your domain in a browser and confirm it loads your Wix website.
- In the Wix Dashboard, check the domain status (it should show “Connected & Active”).
- Test your SSL certificate (look for the padlock icon in your browser).
- If you use email with your domain, send and receive test messages to confirm your MX records are working.
At this stage, your domain is officially managed by Wix. From now on, renewals, DNS settings and SSL certificates are handled directly inside your Wix account.
How Long Does a Wix Domain Transfer Take?
Some Wix users on Reddit report that transfers usually complete within 5–7 days, though timing can vary depending on the registrar and TLD.
Factors That Influence the Speed
Several elements can shorten or extend the transfer period:
- Email Confirmation Timing. The transfer won’t begin until you approve the confirmation email sent to your domain’s administrative contact. If you act quickly, the process starts right away. Delays in checking or clicking the email can easily add a few days.
- Registrar Response Times. Some registrars process transfers faster than others. WordPress (through its registrar partners) usually takes the full 5–7 days, while others may release the domain earlier.
- Domain Extension (TLD). Generic domains like .com, .net, or .org transfer the fastest. Country-specific domains (e.g., .uk, .de, .ca) may follow different rules and can sometimes take longer.
- Outstanding Restrictions. If your domain is under the 60-day lock (after new registration or a previous transfer), you cannot move it yet. You’ll need to wait until the restriction is lifted.
- Payment Processing. Wix won’t initiate the request until the transfer fee (which also covers a one-year renewal) is paid. Any delays in completing payment will hold up the entire process.
If you need your website live on Wix immediately, you don’t have to wait for the full transfer. You can temporarily connect your domain to Wix by updating DNS records at your current registrar, then complete the transfer later.
What Happens to Email and DNS?
When you transfer a domain between the platforms, you’re not only moving the registrar — you’re also changing how your DNS is managed. This can affect email accounts, subdomains, and other connected services. Understanding these effects helps you avoid downtime.
If Your Email Was Set Up Through Your Hosting Provider
In many cases, domain owners also purchase email services from the same provider where the domain is registered or hosted. For example, if your registrar/host bundled a mailbox (like info@yourdomain.com) when you registered your domain, that service may be tied to their DNS settings.
- When you transfer the domain to Wix, the email service provided by your old hosting company usually stops working, since Wix doesn’t automatically carry over MX records.
- If you’re using a third-party email platform such as Google Workspace or Microsoft 365, you’ll need to manually add their MX and TXT records in Wix DNS after the transfer to keep receiving messages.
- If your email was fully dependent on your hosting provider’s own mail servers (e.g., a cPanel-based mailbox), you’ll likely need to either migrate the mailbox to a new provider or set up Wix Email (powered by Google Workspace).
Have a look at the practical example: If your hosting provider gave you a free mailbox (e.g., contact@mydomain.com) and you move the domain to Wix, that mailbox won’t exist anymore unless you set up an alternative. To keep using it, migrate your emails to a new service before you complete the transfer.
How to Reconfigure DNS Records in Wix
Once Wix becomes your registrar, you’ll manage all DNS records from the Wix dashboard.
- Log in to Wix Dashboard → Domains → Advanced Settings.
- Re-add any custom DNS entries you previously had, such as:
- MX records for email.
- TXT records for domain verification (Google Search Console, SPF, DKIM).
- CNAME or A records for third-party services (e.g., a booking app or analytics tool).
- Save the changes. It may take a few hours for them to propagate globally.
Impact on Subdomains
If your WordPress domain was using subdomains (like blog.mydomain.com or shop.mydomain.com), you’ll need to replicate these records in Wix as well.
- If the subdomain points to an external service, you’ll have to add the correct A or CNAME record in Wix.
- If the subdomain hosted content on WordPress, that site will no longer be accessible once the domain is fully transferred unless you rebuild or redirect it.
Before starting the transfer, make a list of all active DNS records and subdomains in your WordPress account. Having this inventory will make reconfiguration in Wix much easier and prevent service interruptions.
How to Keep SEO Safe
One of the biggest concerns during a domain transfer is the potential impact on your website’s search rankings. Search engines don’t like downtime or broken links, and even short interruptions can affect visibility. Fortunately, with proper preparation, you can keep your SEO intact.
The Importance of Avoiding Downtime
Search engines like Google value stability. If your domain goes offline during transfer, crawlers may interpret it as a site outage. To minimize risk, you’ll want to make sure your site setup is SEO-friendly. Wix makes this simple, but you can also explore the best website builders for SEO and site creation if you’re looking at alternatives.
How to prevent this: Always start the transfer while your WordPress domain is still active and pointing correctly. Use domain connection (DNS pointing) as a temporary solution if you need your Wix site live before the transfer finishes.
Check and Maintain Redirects
If your WordPress site used 301 redirects, these must be replicated in Wix. Losing redirects means search engines could encounter broken links, which hurts both SEO and user experience. According to Google’s official site move documentation, keeping redirects active is critical to maintaining your search rankings.
- After the transfer, audit your site with a crawler tool (like Screaming Frog or Ahrefs) to ensure all old URLs redirect properly.
- Make sure canonical tags and URL structures remain consistent.
Update Google Search Console and Indexing
Once the domain transfer is complete, update your site in Google Search Console (GSC):
- Log into GSC and add your transferred domain as a new property (using the domain-level option).
- Verify ownership. With Wix, this is usually automatic, but you may need to add a TXT record if required.
- Re-submit your sitemap through Wix (Wix automatically generates one at yourdomain.com/sitemap.xml).
- Monitor coverage reports to ensure all pages are indexed correctly under the new domain setup.
By the way, keep an eye on your organic traffic in Google Analytics for a few weeks after the transfer. Small fluctuations are normal, but a large drop may indicate broken redirects or DNS misconfigurations that need fixing.
Domain Transfer vs Domain Connection
When moving your site, you have two main options for linking your domain: a full transfer or a connection. Both will allow visitors to reach your Wix site, but the management experience differs significantly.
Key Differences
Summing it up, choose transfer, if you value simplicity, want fewer logins to remember, and prefer Wix to handle both your site and domain in one place. Have complex DNS needs (multiple subdomains or a company email system tied to your current registrar) and don’t want to risk breaking them? Then go for domain connection.
Domain Transfer Cost
When you transfer a domain from, the cost isn’t just a fee — it includes a one-year renewal of your domain. This means that the money you pay covers the transfer process and extends your domain’s expiration date by 12 months.
For example, if your domain was set to expire in March 2025, after transferring it to Wix in October 2024, it will now expire in March 2026. You don’t lose any remaining time — you gain an additional year.
Typical Wix Transfer Pricing
Wix includes a one-year renewal in the transfer price, which makes it competitive compared to many registrars. To see how the website builder stacks up overall – in pricing, features and usability – you can read this detailed Wix review.
Speaking about Wix domain pricing, .com domains cost around $14.95–$15.95 (varies slightly by region). This includes: one-year extension of registration, free WHOIS privacy protection (not always included with other registrars), DNS and SSL management inside Wix.
Comparison With Other Registrars
Here’s how Wix stacks up against WordPress and popular domain providers:
Which Is the Best Value?
- Wix: Great if you want convenience and everything in one account.
- Third-party registrars (like Namecheap): Best if you want maximum flexibility, multiple domains, and advanced DNS tools.
- WordPress: Fine if you’re staying on WordPress, but less cost-effective if you’re moving away.
Even if Wix costs a dollar or two more than a budget registrar, many users find the simplicity of managing domain + website + billing in one place worth the trade-off.
How to Verify That Your Domain Works Correctly After Transfer
Once the transfer is complete, it’s important to confirm that your domain is working properly. This ensures your site is live, secure, and accessible to visitors without issues.
1. Check in the Wix Dashboard
After the transfer finalizes, log in to your Wix account:
- Go to Domains → My Domains.
- Your domain should appear with the status Connected & Active.
- If you have multiple domains, make sure your primary domain is set to point to your Wix site.
If the status shows errors (e.g., “Pending” or “Not Connected”), Wix will usually display troubleshooting tips.
2. Verify DNS with WHOIS Lookup
WHOIS is a public directory that shows registrar and DNS information. Use any free WHOIS lookup tool (like ICANN WHOIS or Whois.com) to confirm:
- The registrar now shows Wix (or Wix’s registrar partner).
- Name servers have been updated to Wix’s servers.
- The expiration date has been extended by one year from the transfer.
This ensures the domain is officially managed by Wix and DNS changes are live worldwide.
3. Confirm SSL Activation
Security is critical for SEO and user trust. Wix automatically issues an SSL certificate once the transfer is complete, but it may take a few hours to activate. To check:
- Visit your site using https://yourdomain.com.
- Look for the padlock icon in your browser’s address bar.
- If you see warnings like “Not Secure,” wait 24 hours, then clear your browser cache.
If SSL still doesn’t activate, re-enable it in the Wix Dashboard under Settings → Advanced → SSL Certificate.
By checking these three areas – Wix dashboard status, WHOIS records and SSL – you can be confident your domain is fully functional after the transfer.
Common Problems and How to Solve Them
Even though transferring a domain between WordPress and Wix is usually straightforward, a few issues can appear along the way. Knowing how to handle them will save time and prevent downtime.
Wrong or Invalid EPP Code
The problem: If the EPP code is incorrect, Wix will reject the transfer request. This often happens if the code was mistyped or has expired.
The solution:
- Double-check you copied the code exactly (including dashes and case-sensitive characters).
- If it still fails, request a new EPP code in your WordPress dashboard. Some registrars generate a fresh code each time for security.
Domain Still Locked at Current Registrar
The problem: If the domain lock wasn’t disabled, the transfer cannot begin. You may see an error in Wix saying “Domain locked” or “Transfer denied.”
The solution:
- Go back to your WordPress (or partner registrar) account and ensure Domain Lock is toggled off.
- In some cases, it may take a few hours for the unlock status to update across servers.
Email Stopped Working After Transfer
The problem: If you were using a domain-based email (like info@yourdomain.com), your MX records may not have carried over to Wix automatically. This results in undelivered or bounced emails.
The solution:
- Log into your Wix DNS settings.
- Re-add your email provider’s MX, TXT, and CNAME records (Google Workspace, Microsoft 365, Zoho etc.).
- Test by sending and receiving messages after saving the changes.
SSL Certificate Error
The problem: After the transfer, your site may show as “Not Secure” because the SSL certificate hasn’t yet been issued.
The solution:
- Wait up to 24 hours — Wix issues SSL automatically once the domain is active.
- Clear your browser cache to ensure you’re not seeing an old error.
- If the problem persists, go to Wix Dashboard → Settings → SSL Certificate and toggle it off and on again to force reactivation.
What you should know is that most problems come down to DNS and timing. If your site or email doesn’t work immediately, don’t panic – many changes take several hours to propagate worldwide. Always allow up to 48 hours before assuming something is permanently broken.
Final Checklist
Before you finish, run through this quick checklist to make sure everything is done correctly.
- Unlock your domain in WordPress (disable registrar lock).
- Request and copy your EPP code.
- Start the transfer in Wix by entering your domain and EPP code.
- Pay the transfer fee (includes a 1-year renewal).
- Confirm the approval email from your old registrar.
- Wait 5–7 days for the registrar to release your domain.
- Monitor DNS propagation (24–48 hours).
- Re-add DNS records in Wix (MX for email, CNAME/A records for subdomains).
- Check your site in Wix Dashboard → should show Connected & Active.
- Verify via WHOIS lookup that Wix is now the registrar.
- Confirm SSL activation (padlock icon visible in browser).
- Test email accounts to ensure messages are sent/received properly.
- Review SEO basics: redirects, sitemap, Google Search Console.
If every item is checked off, your domain transfer from WordPress to Wix is complete, secure and ready to go live.

July Whales